Density Calculator
Calculate Accurate Resistor Values from Color Bands in Seconds with Our Free Resistor Calculator
Table of Contents
- Introduction
- What Is a Density Calculator?
- How a Density Calculator Works
- Key Inputs Every Density Calculator Uses
- Material Presets – Common Substances and Their Densities
- Unit Conversions Explained – kg/m³, g/cm³, and lb/ft³
- Temperature and Its Effect on Density
- Purity Factor and Adjusted Density Calculations
- Density Calculator for Science, Engineering, and Industry
- Standard vs. Purity-Adjusted Calculation Modes
- Common Mistakes When Using a Density Calculator
- FAQs
- Conclusion
Introduction
Density is one of the most fundamental physical properties in science, engineering, and manufacturing. It defines how much mass is packed into a given volume of a substance — and understanding it accurately is critical in fields ranging from materials science and chemical engineering to construction, food production, and quality control. Yet without the right tool, calculating density accurately — especially across different units, temperatures, and purity levels — is a tedious and error-prone process.
That is exactly where a Density Calculator becomes indispensable.
A Density Calculator is a precision tool that computes the density of any substance by taking mass and volume as inputs, applying the correct unit conversions, factoring in temperature conditions and purity adjustments, and delivering results in your preferred output unit — all within seconds. Whether you are a student solving a physics problem, a chemist verifying a compound’s composition, an engineer selecting the right material for a structural application, or a manufacturer monitoring production quality, the Density Calculator eliminates manual calculation entirely.
This guide covers everything you need to know: the formula behind every density calculation, what each input field means, how material presets work, how temperature affects density, what purity adjustment does to your result, and how to avoid the most common mistakes. By the end of this guide, you will use the Density Calculator confidently and get accurate results every time.
What Is a Density Calculator?
A Density Calculator is a digital computation tool that applies the fundamental density formula — Density = Mass ÷ Volume — with full support for multiple unit systems, material presets, temperature logging, and purity correction.
At its core, every Density Calculator answers a simple but powerful question: given a known mass and a known volume, what is the density of the substance occupying that space?
The answer to that question has enormous practical implications:
- A density that matches a known reference value confirms a material’s identity
- A density lower than expected signals contamination, porosity, or voids
- A density higher than expected may indicate adulteration or measurement error
A well-designed Density Calculator handles all of the following:
- Mass input in kilograms (kg), grams (g), or pounds (lbs)
- Volume input in cubic meters (m³), cubic centimeters (cm³), or liters (L)
- Output density in kg/m³, g/cm³, or lb/ft³
- Material presets for water, iron/steel, and aluminum
- Temperature recording in Celsius, Fahrenheit, or Kelvin
- Purity factor adjustment for real-world materials that are not 100% pure
- Standard and purity-adjusted calculation modes
The Density Calculator is used by:
- Students in physics, chemistry, and materials science courses
- Engineers selecting materials for structural, thermal, or fluid applications
- Chemists verifying the identity and purity of compounds
- Quality control technicians in manufacturing and production
- Geologists identifying rock and mineral samples
- Food scientists measuring liquid and solid food product densities
How a Density Calculator Works
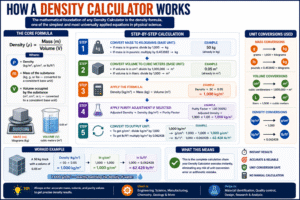
The mathematical foundation of any Density Calculator is the density formula, one of the simplest and most universally applied equations in physical science.
The Core Formula:
Density (ρ) = Mass (m) ÷ Volume (V)
Where:
- ρ = Density (kg/m³, g/cm³, or lb/ft³)
- m = Mass of the substance (kg, g, or lbs — converted to a consistent base unit)
- V = Volume occupied by the substance (m³, cm³, or L — converted to a consistent base unit)
Step-by-Step Calculation:
Step 1 — Convert mass to kilograms (base unit):
- If mass is in grams: divide by 1,000 → kg
- If mass is in pounds: multiply by 0.453592 → kg
Step 2 — Convert volume to cubic meters (base unit):
- If volume is in cm³: divide by 1,000,000 → m³
- If volume is in liters: divide by 1,000 → m³
Step 3 — Apply the formula:
Density (kg/m³) = Mass (kg) ÷ Volume (m³)
Step 4 — Apply purity adjustment if selected:
Adjusted Density = Density (kg/m³) × Purity Factor
Step 5 — Convert to output unit:
- To get g/cm³: divide kg/m³ by 1,000
- To get lb/ft³: multiply kg/m³ by 0.062428
Worked Example: A 50 kg block with a volume of 0.05 m³:
Density = 50 ÷ 0.05 = 1,000 kg/m³ In g/cm³: 1,000 ÷ 1,000 = 1.000 g/cm³ — exactly matching the density of water.
This is the complete calculation chain your Density Calculator executes instantly, eliminating any risk of unit-conversion error or arithmetic mistake.
Key Inputs Every Density Calculator Uses
Accurate results from a Density Calculator depend entirely on accurate inputs. Here is a detailed breakdown of every input field and what it controls.
Material Preset A dropdown selector that loads the known density of common materials — Water (1,000 kg/m³), Iron/Steel (7,850 kg/m³), and Aluminum (2,700 kg/m³). When a preset is selected, the mass and volume fields are pre-filled to reflect that material’s standard reference values. Use presets to cross-check a measured sample against its known theoretical density.
Mass / Weight The measured mass of your substance. This is the most critical input — even small measurement errors amplify significantly when the volume is very small. Always use a calibrated scale and enter the value with maximum precision available.
Volume The space occupied by the substance. For liquids, use a graduated cylinder or volumetric flask. For solids, use water displacement (Archimedes method) or dimensional measurement. Volume measurement errors are the most common source of inaccuracy in manual density calculations.
Mass Unit Select whether your mass measurement is in kilograms (kg), grams (g), or pounds (lbs). The mass measurement tool automatically converts to the base SI unit (kg) before computing density.
Volume Unit Select cubic meters (m³), cubic centimeters (cm³), or liters (L). The tool converts all volume inputs to m³ before applying the formula. Matching the mass and volume units to your measurement instruments avoids transcription errors.
Output Unit Choose your preferred density output format:
- kg/m³ — Standard SI unit, used in physics and engineering
- g/cm³ — Common in chemistry and laboratory settings; water = 1.000 g/cm³
- lb/ft³ — Used in US construction, HVAC, and fluid dynamics applications
Temperature Scale Record the temperature at which the measurement was taken. Select Celsius (°C), Fahrenheit (°F), or Kelvin (K). The tool displays the temperature with your result, providing essential context since density is temperature-dependent for most materials.
Temperature Value Enter the actual temperature at the time of measurement. For liquids especially, density can vary significantly with temperature. Water’s density at 4°C is 1,000 kg/m³; at 100°C it drops to approximately 958 kg/m³.
Purity Factor (%) Enter the purity percentage of your sample. A 95% pure substance has its computed density multiplied by 0.95 in purity-adjusted mode. This is critical for materials that are mixed, alloyed, or not fully refined — using 100% purity for an impure sample would overstate the effective density.
Calculation Mode
- Standard Formula — Applies Density = Mass ÷ Volume with no purity correction
- Purity Adjusted — Applies the purity factor as a multiplier to reflect real-world sample composition
Material Presets – Common Substances and Their Densities
Material presets in a Density Calculator allow instant cross-referencing of measured values against known theoretical densities. Here is an extended reference table of common materials and their standard densities at room temperature (approximately 20°C).
| Material | Density (kg/m³) | Density (g/cm³) | Density (lb/ft³) |
|---|---|---|---|
| Water (pure, 4°C) | 1,000 | 1.000 | 62.43 |
| Ice (0°C) | 917 | 0.917 | 57.24 |
| Seawater | 1,025 | 1.025 | 63.99 |
| Aluminum | 2,700 | 2.700 | 168.56 |
| Iron / Steel | 7,850 | 7.850 | 489.86 |
| Copper | 8,960 | 8.960 | 559.35 |
| Gold | 19,300 | 19.300 | 1,204.86 |
| Lead | 11,340 | 11.340 | 708.01 |
| Concrete | 2,300 | 2.300 | 143.58 |
| Wood (Oak) | 700 | 0.700 | 43.70 |
| Air (20°C) | 1.2 | 0.0012 | 0.075 |
| Ethanol | 789 | 0.789 | 49.25 |
| Gasoline | 740 | 0.740 | 46.21 |
| Mercury | 13,534 | 13.534 | 845.19 |
Key insight: Using this table alongside your mass measurement tool, you can identify an unknown material by measuring its density and comparing it to reference values. A sample measuring 2,700 kg/m³ is almost certainly aluminum; one at 7,850 kg/m³ is iron or steel. Significant deviation from a known reference value indicates impurity, porosity, or measurement error.
Unit Conversions Explained – kg/m³, g/cm³, and lb/ft³
One of the most practically valuable features of a Density Calculator is automatic unit conversion. Scientists, engineers, and technicians across different fields use different density units, and converting between them manually is a source of frequent error.
Understanding the Three Standard Density Units:
kg/m³ — Kilogram per Cubic Meter The SI standard unit. Used in physics, structural engineering, and fluid dynamics. Water = 1,000 kg/m³. This is the base unit your calculation tool uses internally for all intermediate calculations before applying the output conversion.
g/cm³ — Gram per Cubic Centimeter The most common unit in chemistry and laboratory science. Also called g/mL for liquids. Water = 1.000 g/cm³. This unit is convenient because most laboratory substances have density values between 0.5 and 20 g/cm³ — compact, readable numbers.
Conversion: kg/m³ ÷ 1,000 = g/cm³
lb/ft³ — Pound per Cubic Foot Used predominantly in US construction, HVAC, and aviation applications. Water = 62.43 lb/ft³.
Conversion: kg/m³ × 0.062428 = lb/ft³
Practical Example: Density of aluminum = 2,700 kg/m³
- In g/cm³: 2,700 ÷ 1,000 = 2.700 g/cm³
- In lb/ft³: 2,700 × 0.062428 = 168.56 lb/ft³
Your mass and volume calculation tool applies these conversions automatically so you never have to handle them manually, regardless of which unit system your project requires.
Temperature and Its Effect on Density
Temperature is one of the most important environmental variables affecting density, and recording it correctly is essential for accurate, reproducible results.
Why Temperature Matters:
Most materials expand when heated and contract when cooled. As volume changes while mass remains constant, density changes inversely with temperature. This relationship is especially pronounced in liquids and gases, and must be accounted for in precision measurements.
Notable Temperature-Density Relationships:
Water — An exceptional case. Water’s density peaks at 4°C (1,000 kg/m³) and decreases both above and below that temperature. At 20°C it is 998.2 kg/m³; at 100°C it falls to 958.4 kg/m³. Failing to record temperature when measuring water density makes the result meaningless for precision applications.
Metals — Solid metals expand linearly with temperature. Steel’s density decreases by approximately 0.3% for every 100°C increase. At typical room-temperature measurements this is negligible, but for high-temperature industrial processes, always log measurement temperature in your mass measurement tool.
Gases — Gas density is extremely temperature-sensitive. Air at 0°C has a density of approximately 1.29 kg/m³; at 20°C it drops to 1.20 kg/m³. Gas density calculations must always specify temperature and pressure.
The temperature input in the Density Calculator captures and displays the measurement temperature alongside your result — providing the complete context needed for reproducible, scientifically valid documentation.
Purity Factor and Adjusted Density Calculations
Real-world materials are rarely 100% pure. Alloys, solutions, composites, food products, and naturally occurring substances all contain mixtures of components with different densities. The purity adjustment feature of your Density Calculator addresses this directly.
What the Purity Factor Does:
In purity-adjusted mode, the computed density is multiplied by the purity fraction:
Adjusted Density = Computed Density × (Purity % ÷ 100)
Practical Example: A sample of aluminum alloy with 90% aluminum purity:
- Computed density (from mass ÷ volume): 2,650 kg/m³
- Purity factor: 0.90
- Adjusted Density: 2,650 × 0.90 = 2,385 kg/m³
This adjusted value reflects the effective density contribution of the aluminum component alone — useful when you need to separate the material property from the composite measurement.
When to Use Purity Adjustment:
- Alloys and metal composites — when the sample is a known blend of materials
- Solutions and mixtures — when only the density of the dissolved substance is of interest
- Food and pharmaceutical products — when active ingredient concentration affects density
- Geological samples — when minerals are embedded in lower-density matrix rock
When to Use Standard Mode: For pure substances, single-component measurements, or any case where the sample’s bulk density is the target result, the standard formula is the correct choice. Use purity-adjusted mode only when you know the purity percentage and want to isolate the target component’s density contribution.
Density Calculator for Science, Engineering, and Industry
The applications of a Density Calculator span virtually every technical discipline. Here is how different professional fields use density calculations in their daily work.
Physics and Chemistry Education Students use a mass measurement tool to complete lab assignments, verify experimental results, and learn the relationship between physical properties and material identity. A measured density that matches the reference table confirms correct technique; a mismatch reveals an error in measurement or sample preparation.
Civil and Structural Engineering Engineers use density values to calculate the weight of structural components, fluid loads, and soil stability. Knowing the density of concrete (≈2,300 kg/m³) and steel (≈7,850 kg/m³) allows accurate dead-load calculations for beams, slabs, and foundations.
Chemical and Pharmaceutical Manufacturing Quality control labs use density measurements to verify the identity and concentration of raw materials. A batch of solvent that measures a density significantly different from its specification value is flagged for investigation before it enters production.
Food Science and Beverage Industry Density is used to measure sugar concentration (Brix), alcohol content, and product consistency. Brewers use density measurements at the start and end of fermentation to calculate alcohol by volume (ABV). Dairy producers measure milk density to detect dilution or adulteration.
Metallurgy and Materials Testing Density is a key property in materials selection and quality certification. A material’s density determines its strength-to-weight ratio, a critical parameter in aerospace, automotive, and defence applications.
Geology and Mining Mineral identification in the field often begins with density. Gold (19,300 kg/m³) is far denser than pyrite (5,000 kg/m³) — “fool’s gold” — and a simple water displacement measurement using a mass measurement tool can distinguish them instantly.
Standard vs. Purity-Adjusted Calculation Modes
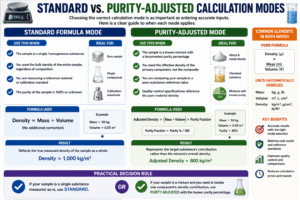
Choosing the correct calculation mode is as important as entering accurate inputs. Here is a clear guide to when each mode applies.
Standard Formula Mode
Use this when:
- The sample is a single, homogeneous substance
- You want the bulk density of the entire sample, regardless of composition
- You are measuring a reference material or calibration standard
- The purity of the sample is 100% or unknown
Standard mode applies Density = Mass ÷ Volume with no additional correction. The output reflects the true measured density of the sample as a whole.
Purity-Adjusted Mode
Use this when:
- The sample is a known mixture with a documented purity percentage
- You need the effective density of the primary component, not the composite
- You are comparing your sample to a pure-substance reference value
- Quality control specifications reference the pure-material density
Purity-adjusted mode multiplies the computed density by the purity fraction, giving a result that represents the target substance’s contribution rather than the mixture’s overall density.
Practical Decision Rule: If your sample is a single substance measured as-is, use Standard. If your sample is a mixture and you need to isolate one component’s density contribution, use Purity Adjusted with the known purity percentage.
Common Mistakes When Using a Density Calculator
Even with a reliable mass and volume calculation tool, input errors produce unreliable results. Knowing the most common mistakes allows you to avoid them systematically.
Using Peak Mass Instead of Stable Mass Scales that are not properly zeroed or not on a level surface give unstable readings. Always zero the scale before placing the sample and wait for the reading to stabilize before entering the value.
Measuring Volume Incorrectly for Irregular Solids For irregular solid objects, the water displacement (Archimedes) method is the most accurate volume measurement technique. Submerge the object fully and measure the volume of water displaced. Using dimensional formulas for irregular shapes introduces significant volume error.
Forgetting Air Bubbles in Liquid Measurements When measuring liquid density, trapped air bubbles inside a graduated cylinder reduce the apparent volume reading and cause a calculated density that is too high. Gently tap the container to release air bubbles before reading the volume.
Mismatching Input Units Entering mass in grams but selecting “kg” in the unit dropdown — or entering volume in liters while selecting “m³” — produces results that are off by a factor of 1,000 or more. Always verify that the unit selector matches the unit of your measurement before calculating.
Ignoring Temperature Measuring a liquid’s density without recording temperature makes the result unreproducible. Two measurements of the same liquid at different temperatures will yield different density values — temperature must always be logged as part of the result.
Applying Purity Adjustment to a Pure Sample Using purity-adjusted mode with a value less than 100% on a pure sample artificially lowers the output. Only apply purity adjustment when you have a documented, verified purity percentage for a mixture or alloy.
Using Startup or Fluctuating Wattage For instruments that draw variable power during operation, take multiple mass readings and use the average. A single unstable reading can significantly skew density output.
FAQs
What is a Density Calculator used for? A Density Calculator is used to compute the density of a substance from its measured mass and volume. It converts inputs across multiple unit systems, applies temperature context, and offers purity correction for non-pure materials. It is used in physics, chemistry, engineering, manufacturing, and food science.
What is the formula used in a Density Calculator? The core formula is Density = Mass ÷ Volume. Mass and volume inputs are first converted to base SI units (kg and m³), the formula is applied, and the result is then converted to the user’s preferred output unit (kg/m³, g/cm³, or lb/ft³).
What does the purity factor do? The purity factor adjusts the computed density to reflect the contribution of the primary component in a mixture. For a sample that is 90% pure, the density is multiplied by 0.90. Use this setting only when the purity percentage is known and documented.
Why does temperature affect density? Most substances expand when heated, increasing their volume while their mass stays constant. Since density = mass ÷ volume, an increase in volume at constant mass results in a lower density. This is especially significant for liquids and gases, and must be recorded with every precision measurement.
What is the difference between kg/m³ and g/cm³? They are the same quantity in different scales. 1 g/cm³ = 1,000 kg/m³. Water has a density of 1.000 g/cm³ or 1,000 kg/m³. Chemistry labs typically use g/cm³; physics and engineering typically use kg/m³.
How do I measure the volume of an irregular solid? Use the Archimedes water displacement method: fill a container with water, note the volume, submerge the object fully, and measure the increase in water level. The difference equals the volume of the object. Enter this value into the mass and volume calculation tool with the correct volume unit selected.
Can I use a Density Calculator to identify an unknown material? Yes. Measure the mass and volume of the sample, compute its density, and compare the result to a reference density table. A density value that closely matches a known material strongly suggests that material’s identity. Use the material preset dropdown as a quick reference check.
What does lb/ft³ mean? Pounds per cubic foot — a density unit common in US engineering, construction, and HVAC. It describes how many pounds of mass are contained in one cubic foot of volume. To convert from kg/m³ to lb/ft³, multiply by 0.062428. Your calculation tool handles this conversion automatically Density Calculator.
Conclusion
Density is a fundamental physical property — and measuring it accurately requires more than a simple division. Unit mismatches, temperature variations, purity differences, and measurement technique errors all affect the final result. A reliable Density Calculator eliminates every one of these sources of error by handling unit conversion, purity correction, and temperature logging automatically and correctly.
The Density Calculator delivers a complete, multi-field result — raw density in kg/m³, final density in your chosen output unit, measurement temperature, volume unit used, and calculation mode — in a single computation that would take several minutes to replicate manually with full accuracy.
For students, it accelerates lab work and confirms experimental results against known reference values. For engineers, it provides rapid material verification without manual unit conversion. For quality control professionals, it delivers traceable, documented measurements with temperature and purity context built into every result.
The range of applications covered by a mass and volume calculation tool is as broad as physical science itself — from identifying a mineral sample in a geology lab to verifying a pharmaceutical compound’s identity to selecting the right alloy for an aerospace component. Every one of these decisions begins with one accurate density measurement.
Use your Density Calculator consistently, enter precise measurements, select the correct units, record temperature with every result, and apply purity adjustment only when justified by documented sample composition. The result is not just a number — it is a scientifically valid characterization of your material, grounded in accurate measurement and reliable computation.
Accurate density measurement starts with a reliable Density Calculator — and accuracy is the foundation of every sound engineering and scientific decision.