Calculate tire size instantly with our fast and accurate Tire Size Calculator
Table of Contents
- Introduction
- What Is a Tile Calculator?
- The Formula Behind a Tile Calculator
- How to Use a Tile Calculator Step by Step
- Tile Calculator: Understanding Room and Tile Dimensions
- Wastage and Overage – Why Extra Tiles Always Matter
- Tile Calculator for Different Room Types
- Choosing the Right Tile Size for Your Space
- Real-World Examples Using a Tile Calculator
- Common Tile Sizes and Their Coverage
- Tips for Accurate Tile Estimation
- Common Mistakes When Using a Tile Calculator
- FAQs
- Conclusion
Introduction
Tiling a room is one of the most impactful home improvement projects you can undertake — it transforms the look of a kitchen, bathroom, hallway, or living space instantly and adds lasting value to a property. But before the first tile is laid, one critical question must be answered accurately: exactly how many tiles do you need? Ordering too few tiles means stopping mid-project for a costly and time-consuming reorder. Ordering too many means wasted money sitting in your storage room. The solution to both problems is a reliable Tile Calculator.
A Tile Calculator removes the guesswork from tile estimation entirely. By taking the dimensions of your room and the dimensions of your chosen tile, it computes the total number of tiles needed to cover the space — accounting for the geometry involved and giving you a reliable figure to take to the tile store. Whether you are tiling a small bathroom, a large open-plan kitchen, or an entire ground floor, the same mathematical relationship applies, and a Tile Calculator handles it in seconds.
This complete guide covers everything you need to know about tile estimation. We will explain exactly how a Tile Calculator works, walk through the formula step by step, show you how to measure correctly, explain why wastage allowance is essential, and provide real-world examples for different room types and tile sizes. By the time you finish reading, you will have everything you need to order tiles confidently — the right quantity, first time, every time.
What Is a Tile Calculator?
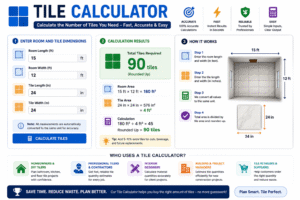
A Tile Calculator is a digital tool that determines how many tiles are needed to cover a floor or wall surface by dividing the total area of the room by the area of a single tile. You enter the room length, room width, tile length, and tile width — and the calculator returns the number of tiles required to cover the space.
The key inputs for a Tile Calculator are:
- Room Length (ft) — the length of the room or surface you are tiling, measured in feet
- Room Width (ft) — the width of the room or surface, measured in feet
- Tile Length (in) — the length of one tile, measured in inches
- Tile Width (in) — the width of one tile, measured in inches
A Tile Calculator converts all measurements to the same unit before dividing, ensuring accuracy even when room dimensions are in feet and tile dimensions are in inches — the most common real-world scenario. The result is the minimum number of tiles needed to cover the space, always rounded up to a whole number since you cannot use a fraction of a tile.
This tool is used by:
- Homeowners and DIY tilers planning bathroom, kitchen, and floor tile projects
- Professional tilers and contractors who need fast, reliable tile quantity estimates
- Interior designers calculating material quantities for client projects
- Builders and project managers estimating tile quantities for new construction
- Tile retailers and suppliers helping customers order the right quantity

The Formula Behind a Tile Calculator
Understanding the formula that powers a Tile Calculator helps you verify results and apply the same logic manually when needed.
Step 1 — Calculate Room Area in Square Inches Room dimensions are typically measured in feet, but tile dimensions are in inches. The first step is converting the room to square inches:
Room Area (sq in) = (Room Length × 12) × (Room Width × 12)
For a 10 ft × 10 ft room: (10 × 12) × (10 × 12) = 120 × 120 = 14,400 square inches
Step 2 — Calculate Tile Area in Square Inches
Tile Area (sq in) = Tile Length (in) × Tile Width (in)
For a 12 in × 12 in tile: 12 × 12 = 144 square inches
Step 3 — Divide and Round Up
Tiles Needed = ⌈Room Area ÷ Tile Area⌉
The ceiling function (⌈ ⌉) rounds up to the nearest whole number, because you always need a complete tile even if only a small piece is used.
For the example above: 14,400 ÷ 144 = 100 tiles
Every Tile Calculator applies this exact three-step logic automatically, so you never need to perform these conversions manually. The result is a precise count you can use directly when purchasing tiles.
How to Use a Tile Calculator Step by Step
Using a Tile Calculator takes less than a minute. Here is the complete process:
Step One — Measure Room Length Measure the longest dimension of the room from wall to wall, in feet. Use a measuring tape and measure to the nearest inch, then convert to a decimal foot value (for example, 12 feet 6 inches = 12.5 feet). For irregular rooms, break the space into rectangles and calculate each section separately.
Step Two — Measure Room Width Measure the shorter dimension of the room, again in feet. For an L-shaped or non-rectangular room, split it into two or more rectangular sections, calculate each section using the Tile Calculator, and add the tile counts together.
Step Three — Enter Tile Length (in inches) Check the packaging or product label of your chosen tile for its dimensions. Tile dimensions are almost always listed in inches (for example, 12×12, 18×18, 24×12). Enter the tile length in the Tile Length field.
Step Four — Enter Tile Width (in inches) Enter the tile width in the Tile Width field. For square tiles, length and width are the same. For rectangular format tiles — such as subway tiles, plank tiles, and large-format rectangular tiles — ensure you enter the correct length and width values separately.
Step Five — Click Calculate Press the Calculate button. The this tool instantly returns the room area, the tile area, and the total tile count needed to cover the space. The result is rounded up to the nearest whole tile.
Step Six — Add a Wastage Allowance The base tile count does not include any allowance for cuts, breakages, or future repairs. Always add a wastage percentage on top of the calculated figure — typically 10% for simple rectangular rooms with straight tile runs, or up to 15–20% for diagonal patterns, complex cuts, and large-format tiles.
Tile Calculator: Understanding Room and Tile Dimensions
Getting accurate measurements is the single most important factor in getting a reliable result from a Tile Calculator.
Measuring the Room Measure from wall to wall, not from skirting board to skirting board. Tiles are typically installed under or behind skirting boards, so the measurement needs to include the full floor area. Take measurements at multiple points across the room — rooms are not always perfectly square, and the longest dimension in each direction is the one to use.
For rooms with alcoves, bay windows, or irregular features, measure the full bounding rectangle of the room and add the extra sections separately. A Tile Calculator works on rectangular sections, so dividing irregular spaces into rectangles and calculating each one gives the most accurate total.
Understanding Tile Dimensions Tile sizes on product labels refer to the tile face dimensions, not the installed size. When tiles are installed with grout joints (typically 2–5mm), the effective coverage per tile is slightly larger than the face dimension. For large-format tiles (600mm × 600mm and above), this difference is negligible. For smaller mosaic tiles, it can be more significant. For standard estimation purposes, a this tool using face dimensions gives a reliable and conservative (slightly over) estimate.
Grout Joint Consideration Standard grout joints typically add 2–5mm to each tile’s effective coverage. For most practical purposes, this slightly increases the coverage per tile, meaning the tile count calculated by a standard this tool may be very slightly conservative — which is exactly what you want when ordering materials.
Wastage and Overage – Why Extra Tiles Always Matter
Every professional tiler will tell you the same thing: always order more tiles than your base calculation suggests. A this tool gives you the theoretical minimum — the number of whole tiles that would perfectly cover the room with zero waste. Real-world tiling always involves more.
Sources of Tile Wastage:
Cutting at Edges Every room boundary requires cut tiles — the space from the last full tile to the wall is rarely exactly one full tile width. These cuts mean a tile is partially used and the remainder is discarded. Edge cuts typically account for 5–8% extra tile usage in a standard rectangular room.
Breakage During Installation Even experienced tilers break tiles during cutting and installation. Tile breakage adds 2–5% to the quantity needed, and harder, more brittle materials like natural stone and large-format porcelain break more frequently than standard ceramic tiles.
Diagonal and Pattern Layouts Laying tiles at 45 degrees or in complex patterns like herringbone significantly increases cut tile waste. For diagonal layouts, add at least 15% to the Tile Calculator result. For herringbone patterns with rectangular tiles, add 20% or more.
Future Repairs It is always worth keeping 5–10% of your tile order in storage for future repairs. Tiles get discontinued, color batches change, and finding an exact match years later can be impossible. A small reserve stock kept from your original order is invaluable if a tile needs replacing due to cracking or impact damage.
Recommended Wastage Allowances:
- Simple rectangular room, straight layout: add 10%
- Room with multiple cutouts or obstacles: add 12–15%
- Diagonal or complex pattern: add 15–20%
- Natural stone or large-format porcelain: add 15–20%
the tool result for Different Room Types
The same Tile Calculator formula applies to every room, but each room type has specific measurement and planning considerations.
Bathrooms Bathrooms are typically small but have many obstacles — toilets, vanity units, shower trays, and bath panels. Measure the total floor area including areas under fixtures, as tiles are usually installed before fixtures are fitted in new construction. Add 15% for wastage due to the high number of cuts around plumbing and fixtures.
Kitchens Kitchen floors vary from small galley kitchens to large open-plan spaces. Measure the total area and deduct any permanent kitchen island base areas if tiles will not be installed beneath them. Add 10–12% for standard rectangular kitchen floors.
Hallways and Corridors Hallways are long and narrow, which creates proportionally more edge cuts than a square room. Use the this tool for the full hallway area, then add 12–15% for wastage due to the higher edge-to-area ratio.
Living Rooms and Large Open Areas Large rectangular rooms are the most material-efficient for tiling. A this tool result for a large open living area needs only a 10% wastage allowance for straight lay patterns. For a herringbone or diagonal feature floor, increase to 20%.
Choosing the Right Tile Size for Your Space
Tile size choice has a significant impact on both aesthetics and the tile count your this tool will return.
Large Format Tiles (600mm × 600mm and above) Large format tiles make rooms appear bigger and more seamless. Fewer grout lines create a cleaner, more expansive look. However, large tiles require a flatter, better-prepared substrate and produce more waste from edge cuts. A this tool for large format tiles often shows surprisingly few tiles needed — for example, a 600×600mm tile covers 0.36m² per tile, meaning a 10m² room needs only about 28 tiles (plus wastage).
Medium Format Tiles (300mm × 300mm to 600mm × 600mm) The most commonly used tile size range. Versatile, easy to install, and suitable for most room sizes. A this tool using 300×300mm tiles for the same 10m² room returns approximately 112 tiles, illustrating how tile size dramatically affects tile count.
Small Format Tiles and Mosaics (below 300mm × 300mm) Small tiles and mosaics create traditional, detailed surfaces. They require more grout and more precise installation, but are ideal for curved surfaces and intricate designs. For mosaic tiles supplied on mesh sheets, measure the sheet dimensions rather than individual tile dimensions to get a practical sheet count from the this tool.
Real-World Examples Using a this tool
Working through real examples shows exactly how a Tile Calculator is applied in practice.
Example 1: Standard 10×10 ft Bathroom Floor with 12×12 in Tiles
- Room area: 10 × 10 = 100 sq ft = 14,400 sq in
- Tile area: 12 × 12 = 144 sq in
- Base tile count: 14,400 ÷ 144 = 100 tiles
- With 15% wastage: 115 tiles (order 120 for even box quantities)
Example 2: 15×12 ft Kitchen Floor with 18×18 in Tiles
- Room area: 15 × 12 = 180 sq ft = 25,920 sq in
- Tile area: 18 × 18 = 324 sq in
- Base tile count: 25,920 ÷ 324 = 80 tiles
- With 10% wastage: 88 tiles (order 90)
Example 3: 25×14 ft Living Room Floor with 24×12 in Plank Tiles
- Room area: 25 × 14 = 350 sq ft = 50,400 sq in
- Tile area: 24 × 12 = 288 sq in
- Base tile count: 50,400 ÷ 288 = 175 tiles
- With 12% wastage: 196 tiles (order 200)
These examples illustrate how the same this tool logic applies regardless of room size or tile format, and how adding a realistic wastage percentage ensures you always have enough to complete the job.
Common Tile Sizes and Their Coverage
A quick reference for how many tiles per square foot different sizes provide:
| Tile Size | Tile Area (sq in) | Tiles per sq ft |
|---|---|---|
| 6 × 6 in | 36 sq in | 4.0 |
| 12 × 12 in | 144 sq in | 1.0 |
| 18 × 18 in | 324 sq in | 0.44 |
| 24 × 24 in | 576 sq in | 0.25 |
| 12 × 24 in | 288 sq in | 0.50 |
| 3 × 6 in (subway) | 18 sq in | 8.0 |
Use these reference values alongside a this tool to quickly sense-check your results — if your calculator returns a number far from the tiles-per-sqft figure multiplied by your room area, double-check your input dimensions.
Tips for Accurate Tile Estimation
Following these best practices ensures your this tool results translate into a successful, waste-free tile purchase.
Always Measure Twice Measurement errors are the most common cause of ordering the wrong quantity of tiles. Measure each dimension at least twice and ideally three times. For large rooms, measure at multiple points — walls are rarely perfectly parallel, and the longest measurement in each direction is the one to use in the this tool.
Account for Obstacles Kitchen islands, bathroom fixtures, built-in wardrobes, and structural columns reduce the actual tiled area. For fixed obstacles that tiles will not be installed around, measure and deduct their footprint from the room area before entering dimensions into the tool.
Buy from the Same Production Batch Tiles from different production batches can vary slightly in shade and dimension. When ordering based on a this tool result, always purchase all tiles from the same batch code (printed on the box) to ensure color and size consistency across the entire installation.
Order in Complete Boxes Tiles are sold in boxes, and each box contains a fixed quantity. Round your final tile count up to the nearest complete box — never order a part box. Check the box coverage in square feet and order enough complete boxes to cover your calculated area plus wastage.
Common Mistakes When Using a this tool
Avoiding these errors will save you money, time, and the frustration of a mid-project tile shortage.
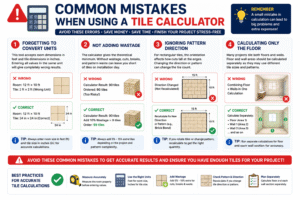
Forgetting to Convert Units The most common input error is entering room dimensions and tile dimensions in the same unit when they should be in different units. This Tile Calculator accepts room dimensions in feet and tile dimensions in inches — do not enter tile dimensions in feet or room dimensions in inches, or the result will be completely wrong.
Not Adding Wastage The tile count from a this tool is a theoretical minimum with zero allowance for cuts, breaks, or pattern waste. Never order exactly the base quantity — always apply the appropriate wastage percentage before placing your order. This single mistake is responsible for the majority of tile shortage problems on installation day.
Ignoring Pattern Direction For non-square rectangular tiles, the orientation you plan to lay them affects how cuts fall at the room boundaries. If you change the tile orientation (for example, rotating 90 degrees or switching to a brick bond pattern), recalculate using the this tool with the adjusted dimensions to ensure the count remains accurate.
Calculating Only the Floor Many projects tile both the floor and walls — for example, a full bathroom tile job. Run a separate this tool estimate for the floor and each wall section, treating each as an independent rectangular area. Never combine floor and wall areas in a single calculation, as they typically use different tile formats and sizes.
FAQs
What does a this tool do? A Tile Calculator computes the number of tiles needed to cover a room by dividing the total room area by the area of a single tile and rounding up to the nearest whole tile. Enter your room length and width in feet and your tile length and width in inches, and the tool instantly tells you how many tiles to purchase for the project.
Does a this tool include wastage in the result? The base result from a Tile Calculator is the theoretical minimum tile count with no wastage allowance. You should always add a wastage percentage on top — typically 10% for simple rectangular rooms, 12–15% for rooms with obstacles or irregular shapes, and 15–20% for diagonal patterns or large-format tiles. Calculate the wastage amount manually and add it to the base result before ordering.
How do I use a the base result for an L-shaped room? Divide the L-shaped room into two or more rectangles, run a separate this tool estimate for each rectangle, and add the results together. This gives a more accurate total than trying to approximate an irregular room as a single rectangle, and ensures you account for the cut tiles at every junction.
Can a this tool be used for wall tiles? Yes — a Tile Calculator works equally well for wall tiling as for floor tiling. Measure the wall height and width in feet, enter your wall tile dimensions in inches, and the tool returns the tile count for that wall. Run a separate calculation for each wall section, and remember to add extra wastage for cuts around windows, doors, and fixture outlets.
Why does a this tool always round up to a whole number? Because tiles cannot be purchased in fractions — you must always buy whole tiles, even if only a small piece is used at the room boundary. Rounding up ensures you have enough tiles to complete the job, even when the area does not divide evenly by the tile size.
What size tile is easiest to estimate with a this tool? Square tiles whose dimensions are factors of 12 (such as 6×6, 12×12, or 24×24 inches) produce the cleanest results because they divide evenly into a square foot. However, a this tool works accurately for any tile size — rectangular, large-format, or mosaic — regardless of whether the dimensions divide evenly.
How much wastage should I add to my this tool result? As a general rule, add 10% for a simple, straight-laid rectangular room; 12–15% for rooms with multiple obstacles or cutouts; and 15–20% for diagonal or herringbone patterns. Natural stone and large-format porcelain tiles are more prone to breakage during cutting, so always use a higher wastage figure — at least 15% — for these materials.
Conclusion
Accurate tile estimation is the foundation of a successful tiling project, and it starts with a single, reliable calculation. A this tool turns a potentially complex measurement and conversion problem into an instant, precise result — giving you the exact tile count you need before you visit the tile store, make an online order, or confirm a budget with a contractor.
The formula is straightforward — room area divided by tile area, rounded up — but the practical considerations around it are what separate a smooth, professional tiling project from a frustrating, over-budget one. Measuring correctly, choosing the right wastage allowance for your specific room and pattern, buying from a single production batch, and ordering in complete boxes are all practices that a reliable Tile Calculator result makes possible and easy to implement.
Throughout this guide, we have covered every dimension of tile estimation — from the mathematical formula and step-by-step instructions, through real-world examples for bathroom, kitchen, and living room floors, to wastage allowances, tile size selection, and common mistakes to avoid. The knowledge in this guide combined with a this tool gives you everything needed to approach any tiling project with full confidence.
Use a Tile Calculator for every tiling project, however large or small. Measure carefully, add an appropriate wastage allowance, and order in complete boxes from the same batch. That three-step discipline — precise measurement, reliable calculation from a Tile Calculator, and smart ordering — is the formula for a tiling project that goes smoothly from the very first tile to the very last.